Custom UIButton edge insets

Since a button has an image and a title, it's easier to implement this design with UIButton. But it's not obvious how to custom the button, let's see how this works out.
First, create relate code about the style and layout.
lazy var button: UIButton = {
    let button = UIButton()
    button.setBackgroundColor(color: UIColor.black, forState: .normal)
    button.setImage(UIImage(named: "dot"), for: .normal)

    button.setTitleColor(.white, for: .normal)
    button.titleLabel?.font = UIFont.systemFont(ofSize: 13, weight: .semibold)

    button.layer.cornerRadius = 12
    button.clipsToBounds = true

    return button
}()

view.addSubview(button)
button.snp.makeConstraints { (make) -> Void in
    make.height.equalTo(24)
    // Other constraints
}
Build and run, oops, the width and margins are wrong.
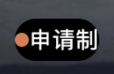
Here's when titleEdgeInsets and contentEdgeInsets really come in useful. First use titleEdgeInsets to move title right by 6 pixels so there is more space between icon and title. Then use contentEdgeInsets to add left (7 pixels) and right (15 pixels) margins to content(aka icon and title). Since we already moved title right by 6 pixels, now the right margin should be 21 pixels.
button.titleEdgeInsets = UIEdgeInsets(top: 0, left: 6, bottom: 0, right: -6)
button.contentEdgeInsets = UIEdgeInsets(top: 0, left: 7, bottom: 0, right: 21)
That's it, now the style should be the same as the design.
Member discussion